
[et_pb_section admin_label=”section”]
[et_pb_row admin_label=”row”]
[et_pb_column type=”4_4″][et_pb_text admin_label=”Text”]Recently I decided that it was time to build myself a workbench in my garage. As the mechanic, groundskeeper, repairman, and scullery maid, I’m constantly digging through piles of tools and junk. Constantly. It’s a waste of life and can frustrate you on some days. I’ve built a couple of simple benches before, and I’ve built elaborate (NOT fine, although that would be awesome if I had the shop) cabinetry and furniture so it wasn’t going to be a difficult project. I designed and built the weird trash can beside the bench, for example, to keep an old hound dog I once had out of the trash. I also discovered some great tips and learned a few things along the way, as I typically do. That’s partly what makes these types of projects fun. Here’s the debriefing:
I started sketching out some ideas, given the limitations, budget(as inexpensive as possible, but not “cheap”) wants, needs, lessons learned from other benches and so on.

I measured out space I had available and spent a LONG time trying to decide between a 6, 7 or 8-foot long bench, and 30-36 inches deep. People think deep benches would be great until they have to reach the back of them and discover their arms aren’t tentacles. I also had the problem of hauling my lumber back, because we don’t have a pickup. Just a couple of soccer-mom SUVs that don’t even have roof racks. So I couldn’t just buy several 12-foot-long boards and a bunch of 4×8 sheets in other words. I had to be frugal with my cargo space. Also, as anyone who works with wood knows, estimating projects is an art that requires some creative mathematical logistics. The goal is to have a little scrap as possible left over. (I cringe when I drive by house construction dumpsters piled high with scrap, although contractors are much better these days with lumber being more costly than when I was little. Every kid in the neighborhood had a half-pipe in their driveway courtesy of the new neighbors.) So there were quite a few considerations.
Also, and this was important, I want to be able to disassemble it and move it fairly easily when needed, yet be as solid and heavy as possible. That was a tough one, but I did it. I didn’t want the additional height of casters and didn’t really feel like engineering around that either. Also, the butthead contractor that built this house only put ONE outlet in the garage. That’s insanity. So I also needed to work some electrical magic. The bench needs a lot of outlets. I have an old tablet and great-sounding Klipsch Bluetooth speaker going on the bench (for music mostly, but also internet advice when I get stuck on something) that need juice, plus soldering irons, chargers, glue guns, lights, USB, a little fridge, and a bunch of other power-hungry items. My power tools will be plugged into some other outlets I rigged elsewhere.
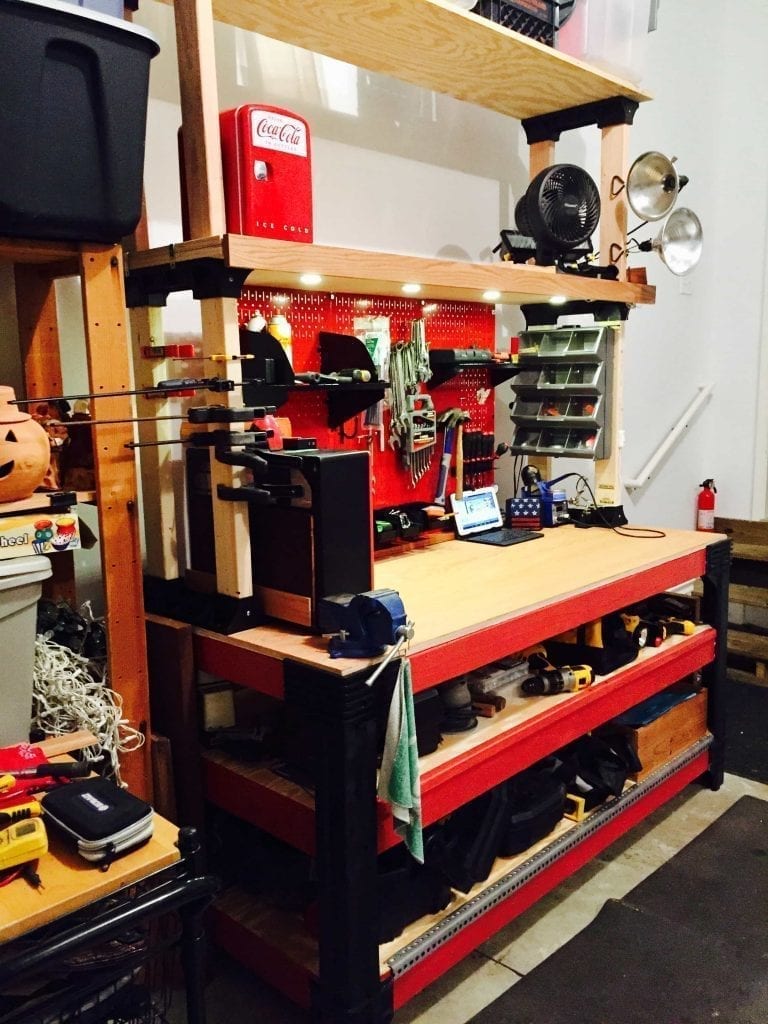
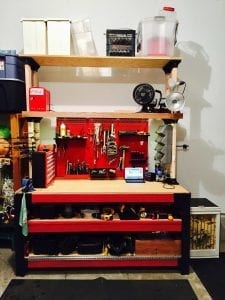
In the end, I chose a 72-inch by 30-inch bench top. Six feet. That allowed me to buy 3 sheets of 4x8x1 plywood, and all 2x4x8’s but one, which was a 2x4x10. It also left some good space around it in the garage. 8 feet would have been unnecessarily tight and large. The benefits of those 2 extra feet of length wouldn’t have been worth the extra material costs and resulting mathematics because the whole thing would need reconfiguring. If I remember, the 8 8-foot boards were about $3.50 apiece and not the poorest quality that were about $3; not the best that were about $5. Just plain studs. I had the store make the cuts for me which mostly were the same length except for the longest, which was a cut-to-fit diagonal brace which was of course only a little over six feet long. This saved me a lot of time and gave me square cuts and chops and nice clean ripped plywood that would have been tough for me to get in my garage setup, which I was obviously underway renovating. And it allowed me to fit it all in my vehicle. By the time I reached that point and unloaded it in my garage it was like assembling a kit. And here’s a big reason for that: I bought the legs and shelf supports already made.
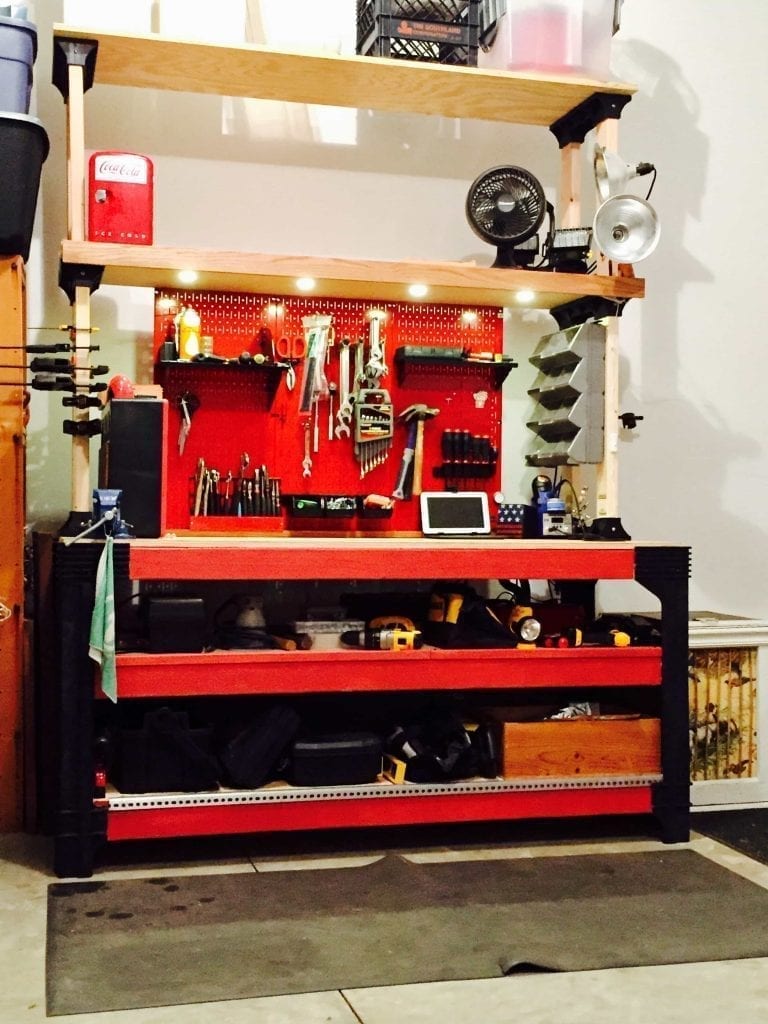
I discovered these things which are awesome and were a key to the project. They make sure your bench and shelves are flat and square and that it’s already at the right height. It comes with brackets and pre-drilled holes for the wood, and makes it super-easy to build, and they’re very affordable. I built this entire thing myself with no help, except for the guy that cut the boards at Lowe’s. For the legs and shelf brackets, they were about $65 on Amazon, and money very well-spent.
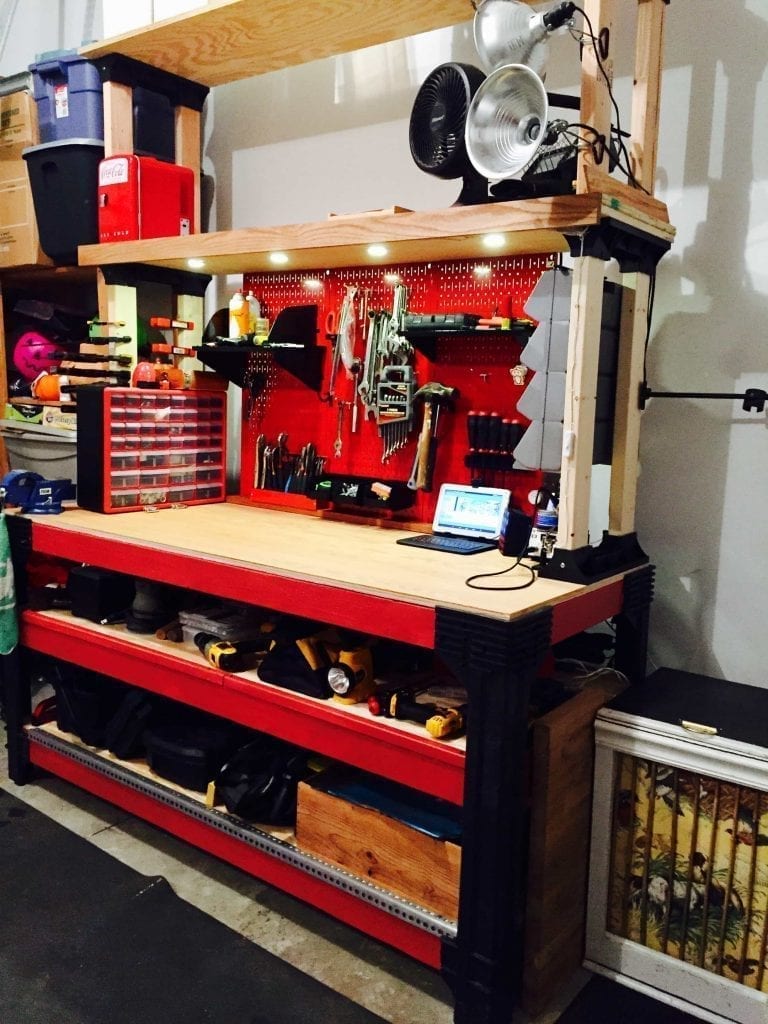
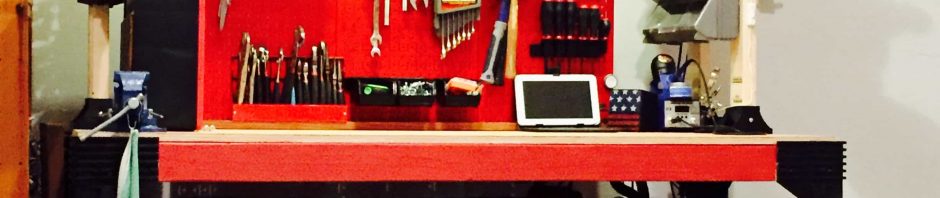
I wanted a pegboard for my tools to go vertical, plus that space would just be wasted otherwise. My tools laying around in piles and in buckets and hidden all over the place was getting to be a bit too much to keep maintaining my sanity. I shouldn’t be spending 5 minutes looking for one socket. And all my sockets and bits and screws and such were rusting away in 20-year-old plastic deli meat containers. Ridiculous. I decided on upgrading this part because these metal powder-coated enameled boards that are heavy-duty should last a lifetime, and have a lifetime warranty to back that up. I’ve come to hate thin MDF pegboard that frays and breaks and pegs have to be jammed into and is crap. These are like what you’d find in a pro shop. They had a premium price too but considering their lifespan and utility I’ll get out of them, they’re a good value. I bought a rack for my many pliers, which I also recommend as well. A really nice, well-made, helpful product that can go onto the pegboard or sit on the bench. I also got some really cool pegs for them to go with the ones that came with them, and since they’re metal, they’re magnetic, which is nice. I have some cool magnets that’ll work well on this board for clipping and hanging things. The metal pegboards are attached to the back of this bench in 2 ways. (They’re made to mount onto a wall and come with the needed hardware.) At the top, they’re screwed into the above-head shelf through pre-drilled holes, and at the bottom, they’re screwed to a 3x1x6 strip of oak I have across the front of the boards along the length at the back of the bench, which also keeps screws and little things from rolling away, and creates a nice little shelf to put little things out of the way. I oiled it as well when I was oiling all the oak.
I screwed a strip of steel across the bottom shelf to prevent wear and tear from feet and other things sliding around on that corner and keep the splinters at bay since I have a 1 year old toddling around. The center shelf has a 90 degree angled strip of molding that was stock from another project which was already primed and I painted. It keeps things from rolling off as well and is easily removed if wanted. For the bottom 2 shelves, I used sanded 1-inch plywood. Nothing too special but much nicer than particle board. $23 a sheet if I remember which was a little more than I wanted to spend but since the essence of the bench is the bench top, and to make my life easier and not harder, ultimately it was worth it to me.
For the rest of the bench, other than the bench and shelf tops, I use some really clean and nice 8-foot pine studs. I was surprised at how clean and knot-free they were compared to what I found at Home Depot not that long ago. Incidentally, I bought my lumber at Lowe’s. For no other reason than their prices were better and their lots of lumber they each had at the time were way different quality. Lowe’s had far better. Their customer service sucked incredibly though, except for the kid that cut my lumber. But that’s another post.
For the top, I used 1-inch sanded oak veneer plywood. In retrospect that wasn’t the best decision, but it’s no big deal because of how I built the bench. The top isn’t secured down by screws; it doesn’t need to be. So I can change out tops easily if and when I want. I considered using 2 or 3 separate pieces as the top but thought the seams would be too much of an annoyance and could see too many problems developing from that. I hope to eventually find a thick solid top to put on there, like an old door, but that’s going to take some doing. I didn’t want to use MDF because of the aforementioned tearing and total hatred of moisture and I just hate the stuff for most projects. It’s frailty, unnecessary weight and short lifespan aren’t worth the marginal cost savings to me. Finding a piece of solid, natural, heavy wood, at retail, would blow my budget. Oak is hard, heavy and durable and nice to look at to boot. The only and main problem is that the sawmills use micron-thin veneers, so I’ll need to be mindful of tossing a transmission up across it. I oiled the top and the small amount of finishing around the bottom above-head shelf with Danish Oil, natural. Tung oil would also work but I’m out. There’s no reason to do any more than that. It’s a workbench. But the oil will condition the wood and help protect it from the slop and spills that are about to be all over it. It’s also cheap, easy to reapply and easy to find.
There’s a diagonal board to support the top which some people seem to feel is optional. I wouldn’t recommend doing that. And considering you can get a board that’ll work for about 3 bucks, if not free if you don’t mind construction-site dumpster-diving, why wouldn’t you? And even if you don’t want to do the math of figuring the diagonal, or using an online calculator or app, you can still just measure it when needed for the proper fit. It just sits atop the leg brackets and doesn’t even need to be secured. The whole thing is nothing but 90-degree cuts and is a basic project, in fact. But the added strength this gives the top is well-worth any effort needed. The top will likely be sagging otherwise, especially if you live in high-humidity areas like the coastal deep south.
I primed and painted the bench to match the rest as best as possible with leftover primer and some red metallic enamel paint I found on sale at Target of all places for $4, which I have a ton left over that I’m excited to use elsewhere. I obviously have a black and red thing going on just by looking at this very site. Red being my favorite color and black being its natural partner. And just coincidentally, my tools and stuff go perfectly together for the most part. All these drawered containers are already changing my life.
I also installed some cabinet lights above, which are hidden behind a 6-foot oak strip I already had, and put the switch on the right shelf post. I was tempted to use velcro or something other than the screws to just slap the lights up there, but I’m glad I wasn’t lazy. Use the screws, after predrilling. You’ll be glad you did. I plan on covering the wires on the post near the switch once I come up with a good idea for doing that. I secured the wires with some clear little removable clips and the twist ties that came with them. 20 clips did the trick. I ran the wires to the front so they’d be hidden. Initially, I instinctively planned to run them to the back because that’s where the plug is and it seemed natural. But after thinking about it, that made less sense. Just a tip.
For the shelves and shelf brackets, which I had never used before, I learned a few things and didn’t follow directions anyway. I had the guy at Lowe’s cut the plywood I bought for the three main lower bench shelves widthwise first, meaning chopping it short, then ripping it lengthwise afterward. This gave me 3 boards that were exactly the same length and depth, and the exact same length of the workbench, and all perfectly square. So I sandwiched 2 of them for the bottom-top shelf above the bench and just a single 1-inch plywood scrap for the very top shelf, which only has empty containers on it so even if there was a disaster, no one would be brained by putting anvils up there.
A 2-inch thick shelf is pretty sturdy, so I’m confident about it. I’d need to buy 12 more 2x4x6s if I were to build them as intended. I don’t see the benefit in that cost, considering what I’ve got. I put the best-looking face of the oak plywood on the bottom shelf facing the bench. I didn’t oil that part-the underside of the “lower-top” shelf. In retrospect, I wish I had because the oil, again, would have not only conditioned it but also reflected the lights onto the bench well, albeit subtly. But it’s a relatively light color which is why I chose to do that, plus the top will take a beating with stuff being tossed and slip up on it, so it makes sense to use the cheaper plywood for the top of the shelving sandwich. And if anyone’s short enough to see up there, it’s nice looking natural wood.
I spent a lot of time planning this out. I wanted to end up with a good bench, which I did, and not spend months on the project (I built this in a couple of hours, once planned.) Usually the least fun parts, the planning and prep are the most crucial to the end result. They paid dividends in this case for sure, which is why I’m sharing the details.
Edit: May 30 – So far I’ve added a 48-inch power strip with surge protector that’s attached with little machine screws and bolts to the base of the pegboard, facing outward, just above the strip of oak along the back. Other than that addition, cleaning up the electrical wires from various tools that I like to have at hand like a Dremel, soldering iron, battery chargers, and a glue gun; arranging the pegboard and drawers better and putting a screw on the side to hang my yardstick, I haven’t had to modify anything major so far.[/et_pb_text][/et_pb_column]
[/et_pb_row]
[/et_pb_section]
3 comments